Skill level: Not for the faint hearted!
A few years ago, when I started working at home, I had a second ADSL line installed so that I could still get online if my ISP had an outage. As well as fault tolerance I wanted to try and use all the available bandwidth rather than just have it sitting there “just in case”. I achieved this using multi path routing and documented the solution here: Over Engineering FTW.
This has been running really well on a Raspberry Pi for about 3 years (with an older kernel, see later in this post for why) but recently the SD card has started to fail. Although this would be easy to fix; simply replace the SD card and copy my scripts over, the rural town I live in has just been upgraded to FTTC and so my connection speed has gone from about 8 Mbps to about 70 Mbps on each line. The first generation Pi doesn’t have enough horsepower to cope with 70 Mbps let alone 140Mbps, and indeed the ethernet interface is only 100Mbps. I had a Raspberry Pi 2 spare anyway so I figured I would use that and add a second gigabit NIC so I could cope with the theoretical 140 Mbps connection to the internet, and since I had two NICs I might as well use both of them.
Physical layout
This is what I came up with:

- Two lines coming from the cabinet to my house, one with Plusnet and one with TalkTalk
- The Plusnet line:
- It came with an OpenReach vDSL bridge and a crappy locked down router, so I chucked the router away and used PPPoE tools to bring up the PPP connection
- The vDSL bridge talks to the Raspberry Pi over a VLAN to keep it separated from the other noise on the switch
- Interface eth1.1000 is an unnumbered interface and ppoeconf uses a layer 2 discovery protocol to find the bridge
- Once the PPP connection is established ppp1 can be used to route traffic to the internet
- The TalkTalk line:
- It too came with a crappy router, but no OpenReach bridge. So I had to use it.
- The TalkTalk router talks to the Raspberry Pi over VLAN 10. Those ports are untagged on the switch, so as far as everyone on that network knows its just a self contained LAN.
- Interface eth0 on the Raspberry Pi has an address on that LAN and uses the TalkTalk router to talk to the internet
- The main LAN:
- Interface eth1 is used to connect to the main LAN
- Clients on the LAN use the Raspberry Pi as their default gateway
With me so far? Essentially we have the normal eth0 interface of the Pi connected to one LAN with its own router and eth1 (a USB gigabit ethernet adapter) has a tagged VLAN for connection to the OpenReach bridge (eth1.1000) and an untagged default network for connecting the the main LAN. Once the layer 2 connection with the bridge is established a PPP connection becomes the second route to the internet.
The death of route caching
Around version 3.6 of the Linux kernel “route caching” was removed. With route caching in place you could set up a default route with multiple hops, something along the lines of:
ip route add default nexthop via 192.168.1.254 dev eth0 nexthop via 192.168.2.254 dev eth1
When a packet needed routing to the internet the kernel would do a round-robin selection of which route to use and then remember that route for a period of time. The upshot of this was, for example, that if you connected to www.bbc.co.uk and got routed first via 192.168.1.254 and so SNATed to 212.159.20.70 then all subsequent traffic for that destination also got routed via the same route and had the same source IP address. Without route caching the next packet to that same destination would (probably) use the other route, and in the case of my home user scenario would arrive from a different source IP address – my two internet connections having different IP addresses. Although HTTP is a connectionless protocol this change of IP address did seem to freak some services out. For protocols with connections the story is worse, e.g. packets of an SSH connection would arrive at the far end from from two different IP addresses and probably get dropped. Route caching was a simple fix for this issue and worked well, as far as I was concerned anyway.
Im sure the reasons to remove it are valid, but for my simple use case it worked very well and the alternative, and now only option is to use connection marking to simulate the route caching. When I first looked at it I was baffled and thought I would just go back to a pre 3.6 kernel and use route caching again. But, in the standard Raspbian distro there isn’t a kernel old enough for the Raspberry Pi 2 to make use of it.
So I was stuck… I had to use a Raspberry Pi 2 to get enough packet throughput to max out my internet connections, and I couldn’t use route caching because there wasn’t a kernel old enough. This meant I was going to have to either compile my own kernel or learn to use connection marking. Joy.
Alternative projects
The documentation for Netfilter is extensive but I found a lot of it to be out of date and very hard to grok. I found a few projects who had already implemented connection tracking/marking namely FWGuardian and Fault Tolerant Router.
FWGuardian is, as far as I can tell, designed for something orthogonal to my set up. Where you might have lots of connections coming in to a server, or a number of offices which need to connect to other offices via pre-defined routes. I played around with it for a while, and Humberto very kindly offered me support over email, but ultimately it was too involved and complex for my needs. You should check out the project though if you have advanced requirements. It’s got some brilliant features for a more enterprise oriented setup.
Fault Tolerant Router is a much simpler setup and matched my requirements very closely. At it’s core it’s a Ruby script which can write your iptables rules and routing tables and constantly monitor the links. If one goes down it can dynamically rewrite your rules and direct all traffic down the working connection. However, it’s not expecting to use a PPP connection where gateways can change and it’s not really been tested with VLANs, although in practice it handled VLANs just fine.
But, at the end of the day, I wanted to learn how to do this myself and so I used the rules generated by Fault Tolerant Router to understand how connection marking was supposed to work and then started to implement my own home-grown solution for teh lolz.
Multi-path routing and connection marking
As I understand it, the idea with connection marking, or connection tracking – I’m not sure what the difference is, is that when a new conversation starts the packets are marked with an identifier. You can then set ip rules to dictate which route packets with a particular mark take. In essence once a new connection is established and a route selected, all other packets in that conversation take on the same mark and so the same route. This emulates the route caching of the past. I don’t really get how, in the case of an HTTP conversation (or flow) which is connectionless, all the packets in the conversation get marked the same. This page has some more details, but I haven’t read it properly yet. Anyway, we don’t know HOW it works, but it does. Good enough.
IPtables
First of all we need to create the iptables configuration to set up connection marking. Here’s the relevant extract from the iptables.save file:
*mangle
 :PREROUTING ACCEPT [0:0]
 :POSTROUTING ACCEPT [0:0]
 :OUTPUT ACCEPT [0:0]
 :INPUT ACCEPT [0:0]
 [0:0] -A PREROUTING -i eth1 -j CONNMARK --restore-mark
[0:0] -A PREROUTING -i ppp1 -m conntrack --ctstate NEW -j CONNMARK --set-mark 1
[0:0] -A PREROUTING -i eth0 -m conntrack --ctstate NEW -j CONNMARK --set-mark 2
[0:0] -A POSTROUTING -o ppp1 -m conntrack --ctstate NEW -j CONNMARK --set-mark 1
[0:0] -A POSTROUTING -o eth0 -m conntrack --ctstate NEW -j CONNMARK --set-mark 2

-i = –in-interface and -0 = –out-interface
These rules set a mark depending on which interface is used. These changes happen in the mangle table.
Packets going in or out the WAN via ppp1 or eth0 which are a new connection are marked with a 1 or a 2 depending on which interface they use. The decision about which route to use is done in the rules which we will see later. Any packets coming in to eth1, so from the LAN, have their marks restored on the way in so they can be dealt with accordingly.
Now let’s have a look at the filter table:
*filter
:INPUT DROP [0:0]
:FORWARD DROP [0:0]
:OUTPUT ACCEPT [0:0]
:LAN_WAN - [0:0]
:WAN_LAN - [0:0]

[0:0] -A INPUT -i lo -j ACCEPT
[0:0] -A INPUT -i eth1 -j ACCEPT
[0:0] -A INPUT -m conntrack --ctstate RELATED,ESTABLISHED -j ACCEPT

[0:0] -A FORWARD -m conntrack --ctstate RELATED,ESTABLISHED -j ACCEPT
[0:0] -A FORWARD -i eth1 -o ppp1 -j LAN_WAN

[0:0] -A FORWARD -i eth1 -o eth0 -j LAN_WAN
[0:0] -A FORWARD -i ppp1 -o eth1 -j WAN_LAN
[0:0] -A FORWARD -i eth0 -o eth1 -j WAN_LAN

## Clamp MSS (ideal for PPPoE connections)
[0:0] -I FORWARD -p tcp --tcp-flags SYN,RST SYN -j TCPMSS --clamp-mss-to-pmtu
[0:0] -A LAN_WAN -j ACCEPT
[0:0] -A WAN_LAN -j REJECT
The default policy is set to DROP, so any packet not matching one of the rules are dropped.
INPUT applies to packets which are bound for the router itself. Packets from the local interface are allowed, and packets from eth1 (the main LAN) are also allowed.
FORWARD applies to packets which are passing through the router on their way somewhere else. Packets which are known to be part of an already in-progress session are allowed. Packets are then categorised as LAN to WAN or WAN to LAN and dealt with by the rules LAN_WAN or WAN_LAN, getting accepted and rejected respectively. All this boils down to LAN clients using the Raspberry Pi as a router and so having their packets forwarded are allowed out and packets coming in from the internet are rejected, the exception being if they are part of an on-going connection.
Clamping MSS to MTU deals with a particular issue with using PPPoE connections where the MTU can’t be the usual 1500 bytes. Because a lot of ISPs block the ICMP messages that would normally deal with asking the client to send smaller packet sizes we use this handy trick to make sure that packets can go out unfragmented. If you find that some web pages are slow to load and others are not, then try switching this on. If you’re only using upstream ISP provided routers you probably don’t need this.
Lastly in iptables we enable SNAT or masquerading so that connections out to the internet appear to come from a valid internet routable IP address not our LAN IP address:
#SNAT: LAN --> WAN
[0:0] -A POSTROUTING -o ppp1 -j SNAT --to-source 212.159.20.70
[0:0] -A POSTROUTING -o eth0 -j SNAT --to-source 192.168.1.253
Routing tables
We’ve configured iptables to add a mark to traffic depending on which WAN interface it is going in or out of. But this is only marking the packets, there is no logic to make sure that packets of the same mark use the same route. To make this happen we use ip rules.
First create three new routing tables by editing /etc/iproute2/rt_tables. I’ve added this to the bottom:
1 plusnet
2 talktalk
3 loadbal
Now we add a default route to the first two of those tables:
ip route add default via $PPP_GATEWAY_ADDRESS dev ppp1 src 212.159.20.70 table plusnet
ip route add default via 192.168.1.254 dev eth0 src 192.168.1.253 table talktalk
$PPP_GATEWAY_ADDRESS is set when the PPP session is established and changes. We can look at ways to find that address later, but for now just substitute the “P-t-P” IP address from “ifconfig ppp1” or whatever your ppp interface number is, or in the case of an ISP-provided router, the LAN side IP of that router.
This is simply creating a routing table with the name of the ISP that will be used and a default route which can find its way to the internet for that ISP.
Next we create the loadbal routing table which is a combination of the previous two:
ip route add default table loadbal nexthop via $PPP_GATEWAY_ADDRESS dev ppp1 nexthop via 192.168.1.254 dev eth0
which is the same idea as we used in the old route caching days, a round-robin route which flicks between the two available routes to the internet.
ip rules
We’ve now created the iptables entries to track and mark traffic from each of the two ISPs and add some basic firewalling and IP masquerading. We’ve also created a routing table for each ISP and a load-balancing table which splits the traffic between the two ISPs.
Now we need to create some rules to govern which of the routing tables is used for a particular connection. The commands to do this are:
ip rule add from $PPP_IPADDR table plusnet pref 40000
ip rule add from 192.168.1.253 table talktalk pref 40100
ip rule add fwmark 0x1 table plusnet pref 40200
ip rule add fwmark 0x2 table talktalk pref 40300
ip rule add from 0/0 table loadbal pref 40400
The rules are matched in numerical order based on preference and once a rule matches that’s it. The first two rules make sure that traffic from the routers uses the correct table.
The important rules are the last three. Traffic which has been marked “1” will always use the plusnet routing table, traffic marked as “2” will always use the talktalk routing table. This ensures that all traffic which is part of an on-going conversation will always use the same router out to the internet, and so always come from the same IP address.
The last rule only matches traffic which is not already marked i.e. new conversations. This routing table, as can be seen in the previous section, has a multi-path route to balance traffic between the two routes out. Once a conversation is established the IPtables conntrack rules will mark the traffic and so one of the two fwmark rules will match.
Now delete the main default route so that the above rules don’t get bypassed with a route in the “main” table:
ip route del default
And that’s it. You should now have a router which splits the traffic fairly evenly across two internet connections and keeps tabs on which packets should go out of which routers. I’ve had this running for a month or so now, and it seems to be working fine. I’ve had the Pi lock up a couple of times, but I think that’s related to the USB gigabit ethernet adapter.
Smart Netflix hacks
Services such as unblock-us allow you to work around some geographic content blocks by acting as your DNS server and replying with the IP address of, say, the US based Netflix server instead of the UK ones. I’ve installed dnsmasq on my Pi as well and configured it to use the Unblock DNS servers instead of my ISP or Google servers. The clients on the LAN get their network configuration over DHCP from the Pi which sets the DNS server address for the clients to the Pi itself which then handles DNS lookups using the Unblock servers upstream. This works really well for most Netflix clients but I was having a lot of problems getting the Chromecast to work with Netflix and Unblock US.
It turns out that Google have hard-coded it’s own DNS servers into the Chromecast and so your local DNS settings are ignored. Nice one Google.
Because we’re using a Linux box as our router we can do this:
iptables -t nat -A PREROUTING -s <Netflix Client IP>/32 -d 8.8.8.8 -p udp --dport 53 -j DNAT --to <Alternative DNS Server IP Address>
 iptables -t nat -A PREROUTING -s <Netflix Client IP>/32 -d 8.8.4.4 -p udp --dport 53 -j DNAT --to <Alternative DNS Server IP Address>
Using the NAT table we rewrite the DNS lookup bound for Google’s DNS servers to send it to our dnsmasq server instead. lol.
Spreading interrupts across cores
Network cards have queues for tx and rx. Higher end cards will typically have more queues, but on the Pi the on-board NIC (which is actually connected via USB) has one for tx and one for rx, as do the VLAN interfaces and the PPP interfaces. Each of these queues has a CPU affinity and it seems that by default the queues all use the same CPU core.
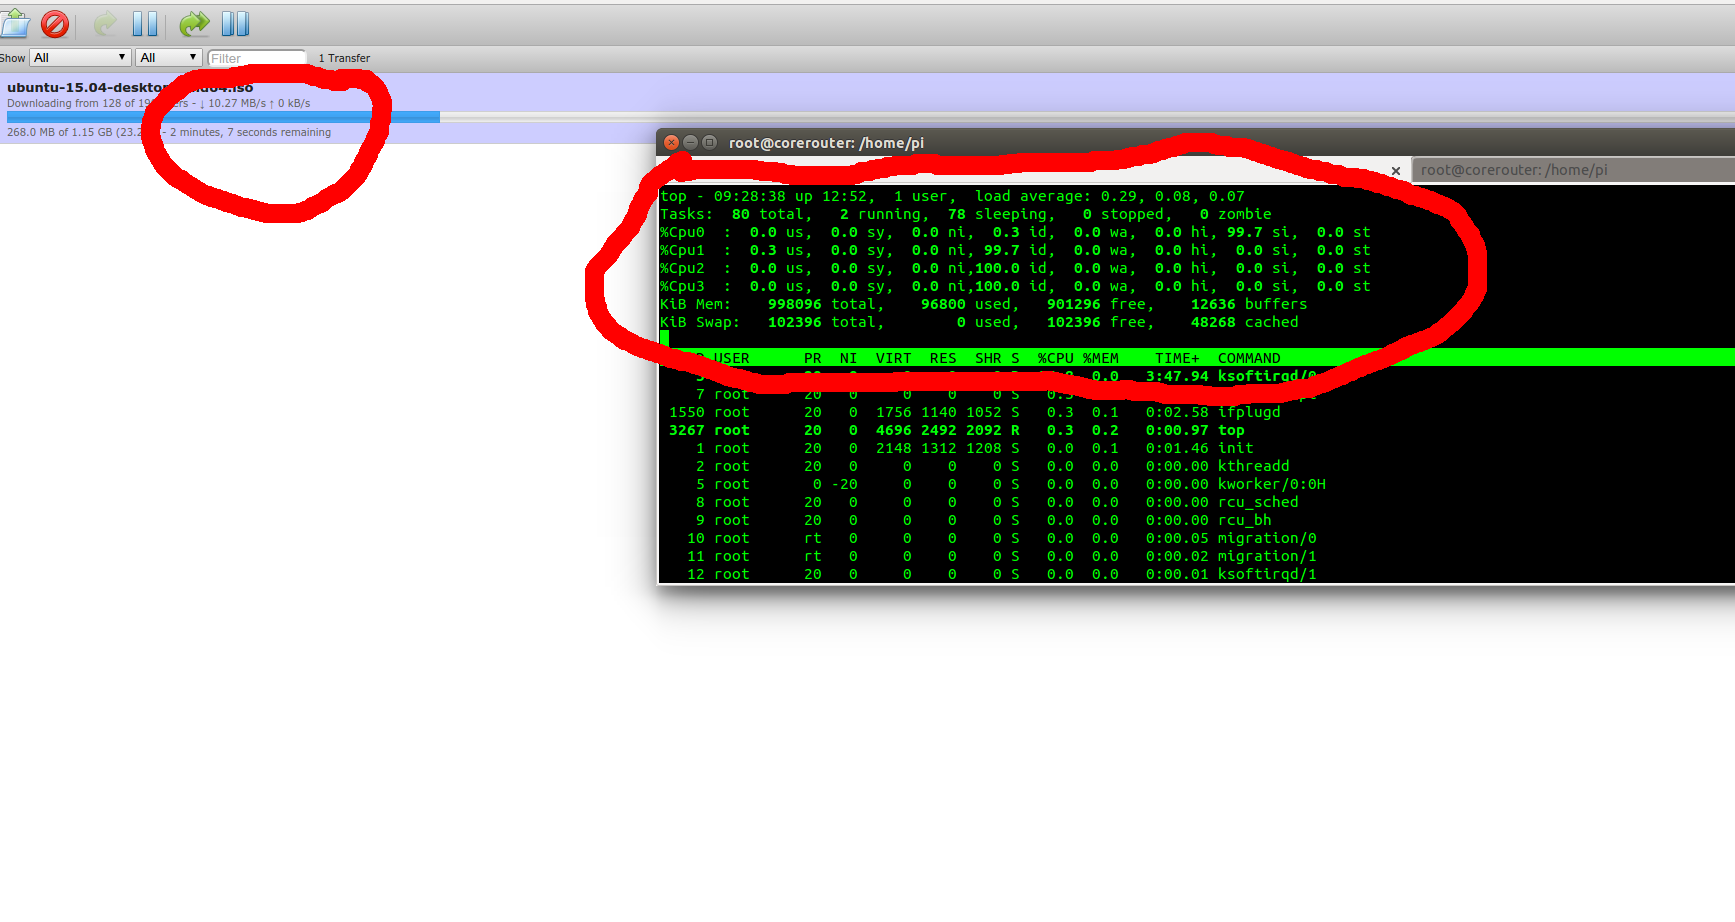
When downloading an ISO with BitTorrent and the load-balancing set up I was able to achieve just over 10 MBytes a second. But the Pi became really unresponsive. Looking at top showed one CPU core maxed out in soft interrupts:
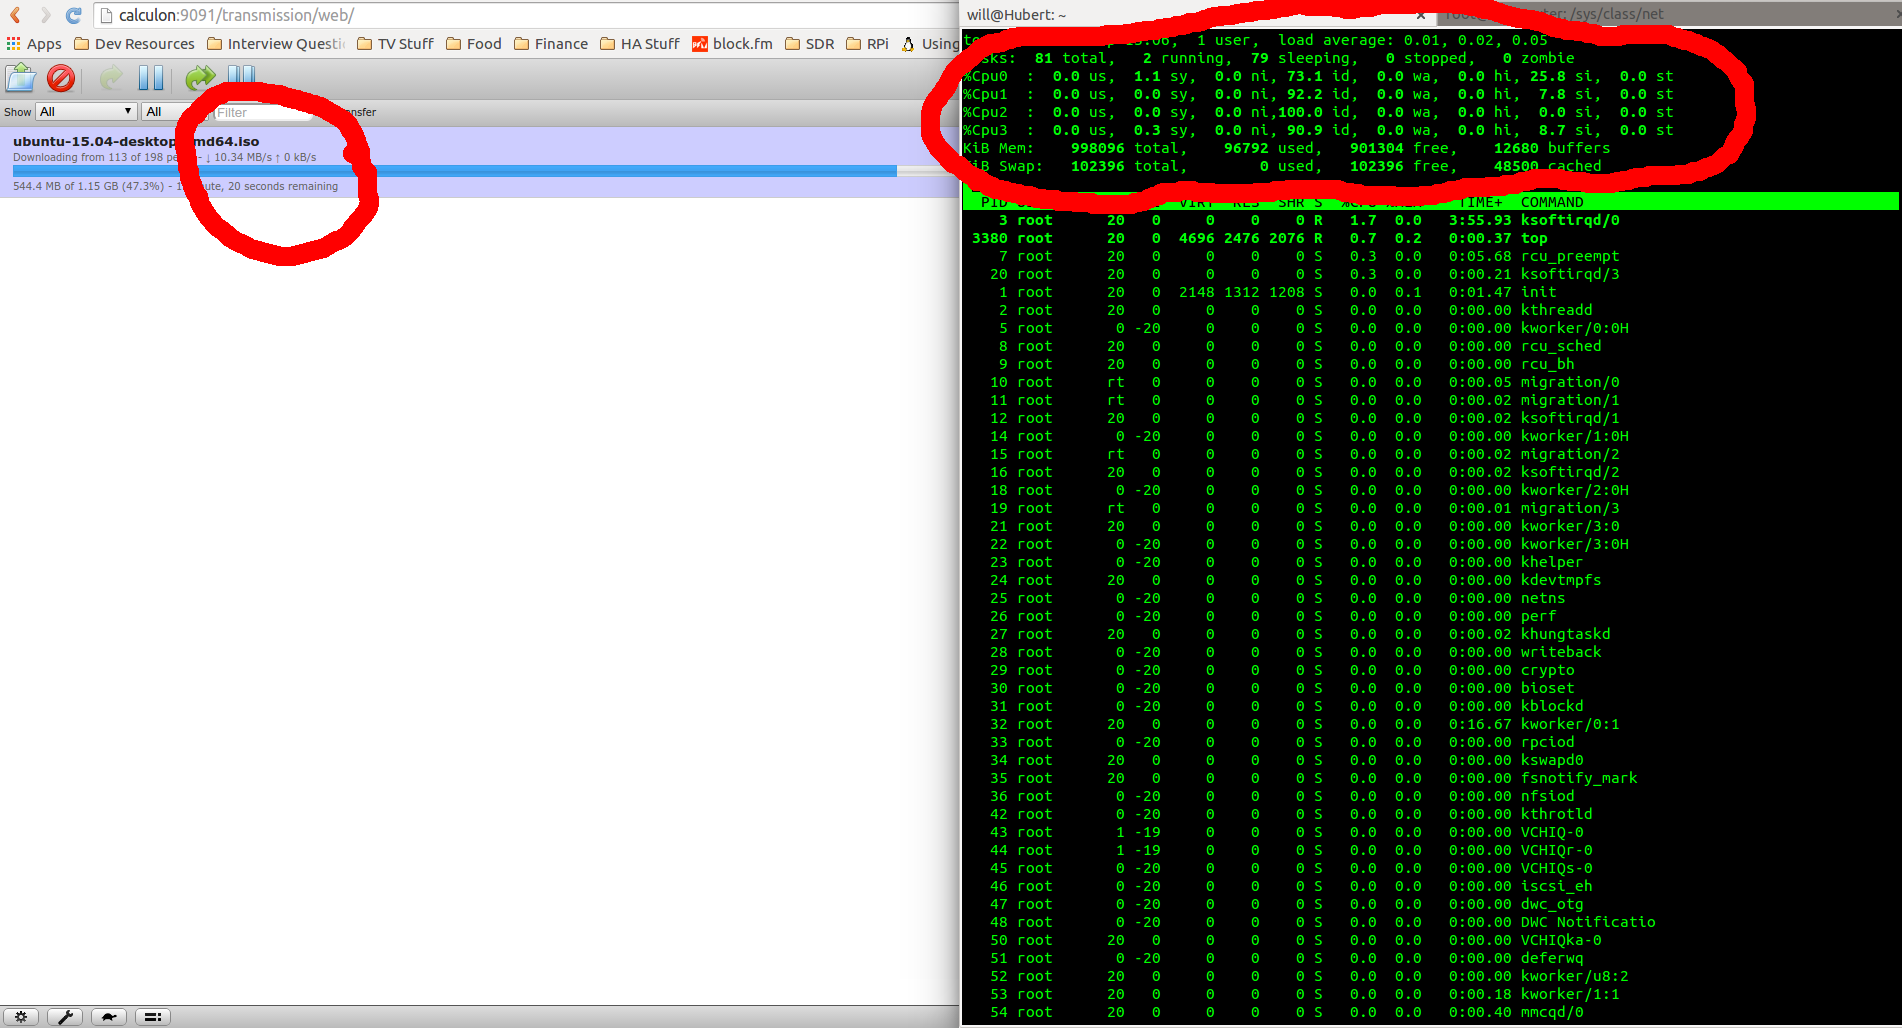
By adjusting the CPU affinity to spread these IRQs across multiple CPUs I squeeze out a tiny bit more network throughput, but more usefully the Pi remained responsive under heavy load:
The commands I used to do this are:
echo 1 > /sys/class/net/eth0/queues/rx-0/rps_cpus
echo 1 > /sys/class/net/eth0/queues/tx-0/xps_cpus
echo 2 > /sys/class/net/eth1/queues/tx-0/xps_cpus
echo 2 > /sys/class/net/eth1/queues/rx-0/rps_cpus
echo 4 > /sys/class/net/eth1.1000/queues/tx-0/xps_cpus
echo 4 > /sys/class/net/eth1.1000/queues/rx-0/rps_cpus
echo 8 > /sys/class/net/ppp1/queues/tx-0/xps_cpus
echo 8 > /sys/class/net/ppp1/queues/rx-0/rps_cpus
Source
Here’s a tgz file containing my iptables rules and a script to set up the above: routing
Update: I’ve put the files in this Github repo: https://github.com/8none1/multipathrouting
If you’re interested in helping to make the scripts a bit more generic and adding fault-tolerance let me know.