Skill level: Easy enough if you’ve got a soldering iron.
Introduction
The Pro Mini V2 is an Arduino Pro Mini clone available on eBay for, typically, £1.50. The version I buy is adjustable between 5v and 3.3v and has an ATmega 328 clocked at 8 MHz. It’s an ideal board for development of IoT remote sensors and great for playing with and learning about the Arduino development environment.
Here’s a link to the version I buy and know works: 3V Pro Mini 2 Arduino Clone
When you want to put a sensor in a remote location the last thing you want to do is have to run a power cable to it. I’ve experimented with solar with generally poor results so battery operation is the obvious solution. While Li-ion batteries offer higher energy density the sweet spot still seems to be the good ol’ alkaline battery. They’re cheap, safe, recyclable and readily available.
For what it’s worth the Ikea alkaline batteries offer good value: http://www.batteryshowdown.com/results-lo.html (I suggest buying as many packets as you can carry, so that you never ever have to go back there. Unless you like arguing with your wife of course.)
Power Usage
The ATmega 328 has various power saving functions which involve putting it to sleep when not doing anything. I use the Rocket Scream Low Power library to take care of putting the processor into a low power state, but I wasn’t seeing anything like the low power savings they detail on their site.
Some quick calculations: Let’s assume a AA battery provides 2000 mAh. I measured my Pro Mini V2 as drawing 6.7mA when powered up and doing things and 2.8mA when in sleep mode. As a conservative estimate, let’s say it’s running for 1 hour in every 24 hour period and asleep the rest of the time. That averages out to about 3mAh of draw.
For a 2000 mAh battery, that would give about 667 hours of runtime, or 28 days. So a standard Pro Mini V2 could run for about a month on a pair of AA batteries. Not bad, but I think changing the batteries every month is still going to be a bit of a drag. Besides, Rocket Scream are seeing power usages in the micro-amps range when asleep. There is clearly work to do.
How to dramatically reduce the power consumption
In this photo you can see I’ve identified some sections which are related to the power usage of the Pro Mini.
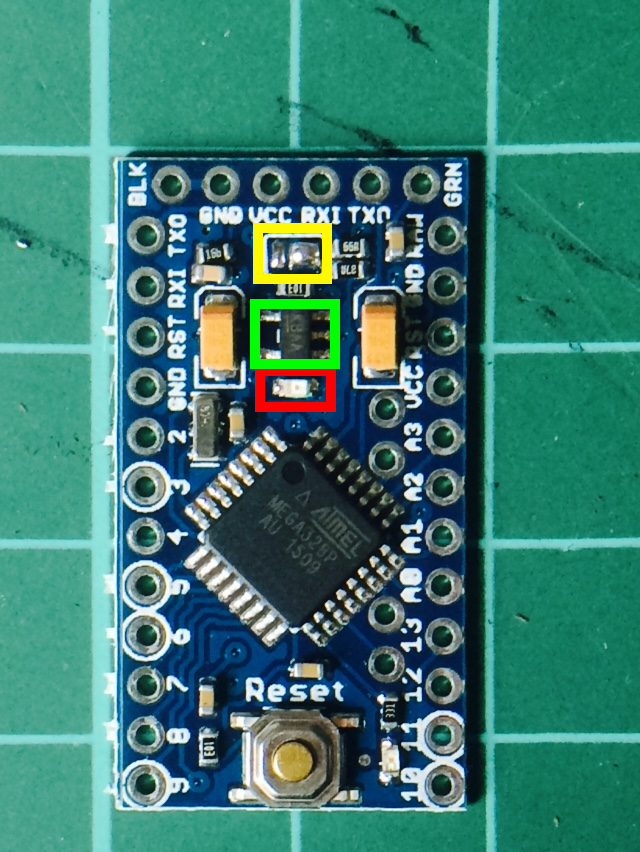 The red section is the power LED. This is always on when power is applied and sucks about 0.2mA when lit. If you don’t need this to be lit all the time then you can easily remove it to save some juice. I found the easiest way was to use a pair of cutters to snip/crush the middle of the LED and then use a soldering iron to remove the bits left over.
The green section is the on-board regulator. If you are going to be supplying power to the board via a couple of AA batteries (each battery being 1.5v, so two is 3v) then you don’t need the regulator. You can cut this off too if you like, but.. keep reading, there’s no need to hack it off.
Saving the best until last, the yellow section is the power-selection jumper to switch between 3.3v and 5v. It passes the power supplied by the RAW pin through the regulator and on to the board. The regulator is inherently inefficient. You might think that you could bypass the on-board regulator by powering the board by apply power to the Vcc pin instead, but it still seems to power the regulator. By simply unsoldering this jumper you can disable the on-board regulator and save loads of power. Once removed you will need to apply power to the Vcc pin at ~ 3.3V. I used some solder-wick to clean up but you could just scrape it off with a soldering iron if you need to.
Here’s one I prepared earlier.
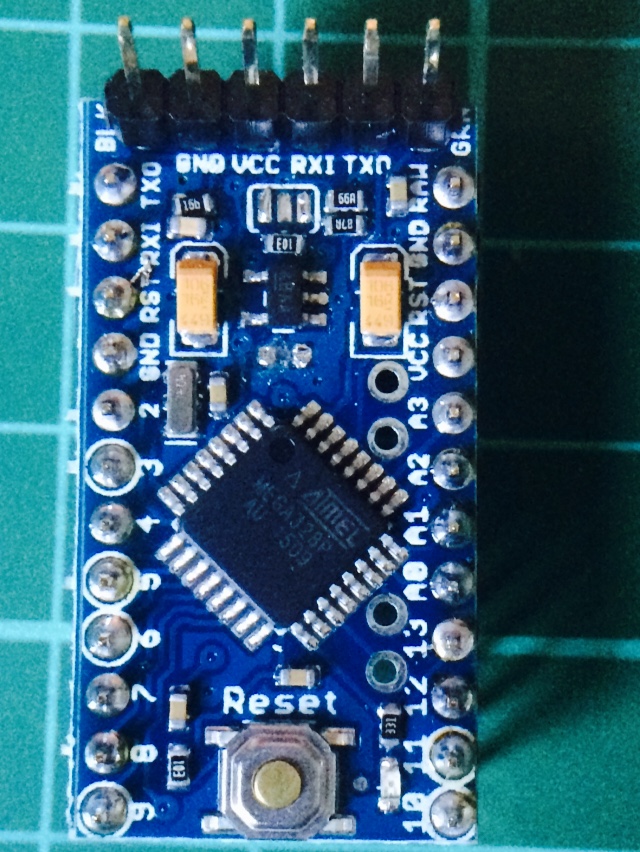
With the jumper and LED removed. (Red and yellow boxes from previous image)
With the LED and solder jumper removed I measured the power usage again. Running current is now down to 3.8mA, pretty much half of what it was. But, most impressively the power used when asleep is down to 0.004mA. 4 microamps! Yay!
Some more quick calculations based on the same usage as before: average power consumption drops to 0.17mA. That gives us 490 days, 1.3 years run time off a pair of AA batteries. That should allow for 2.5 minutes “work” an hour. Waking up, taking some readings and sending them off via a radio should take well under 1 minute, which should allow for more power usage by a radio.
Conclusion
Unless you’re going to run your Arduino off a permanently attached serial connector, then just do this. Get yourself a couple of AA batteries & a battery holder. Apply the +ve side of the batteries to Vcc and the -ve to ground. Stick your multi-meter in between the battery and Vcc pin to measure the lovely low current usage. You can read the battery power being provided with the Secret Arduino Volt-meter trick.
I’ve got quite a few sensors around the house running with this set-up so I will monitor battery usage over the next few weeks or months and report back.
Coming Soon…
A write up of my cheapo IoT sensor network, including smoke detectors, door contact sensors, movement sensors, house-plant watering monitors, room temperature sensors and a weather station. Plus, build an IoT sensor and buy a sausage roll for less than a fiver.