Background Story
With the recent news about the ISP UK association proposing Mozilla as “Internet villain of the year” for enabling DNS over HTTPS (and subsequently changing their mind and dropping the whole category of villain of the year. Good move I think.) I figured it was probably about time that I looked at enabling DoH at home.
Cloudflare have a suite of open source tools called cloudflared which has, among other things, a DNS over HTTPS proxy. By default it points at their 1.1.1.1 service, but you can change that if you want to. Note, at the time of writing there is a bug which seems to stop Google’s DNS service working. If you’re looking to stop people seeing your DNS traffic then Google probably isn’t the right DNS service to use anyway.

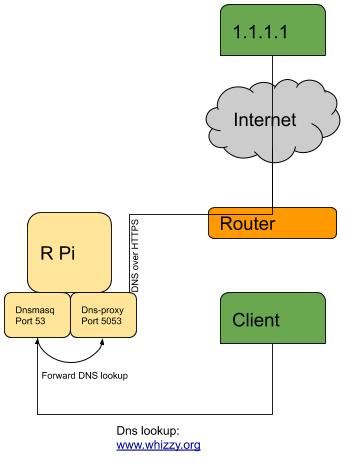
I already have dnsmasq running as my DNS server and I have quite a lot of config which I wanted to keep (e.g. adblocking) so I figured I would add cloudflared’s proxy-dns alongside dnsmasq and have dnsmasq use proxy-dns as it’s upstream server, which would in turn pass the DNS lookups to 1.1.1.1 over HTTPS. dnsmasq would then cache the results locally.
So far, so good. I’d built cloudflared on my desktop to test it, now I wanted to move it on to the Raspberry Pi, run it as a service, and ideally have a package so that I didn’t have to mess around rebuilding it in loads of places if I wanted to move to a different box.
Make a snap
Making a snap of proxy-dns would give the the package I wanted, and could allow me to run proxy-dns as a daemon with two words in the YAML. Snapcraft’s build service would build me an ARM binary, as well as loads of others, for free.
I downloaded the source for cloudflared and added three files:
- A snapcraft.yaml which describes how to build cloudflared and sets it to be run as a daemon
- A configure hook which lets me set some config options
- A launcher script which sets the config at run time
None of these are very complicated, as you can see. Hat-tip to Popey for help with the snapcraft.yaml.
The I pushed these back to my project on GitHub and added that project to the Snapcraft.io build service. Now, whenever I push a new change back to GitHub the snap will get rebuilt automatically and uploaded to the store! All I would need to do is a snap refresh and I’d be upgraded to the latest version. All my requirements solved in one place.
How to use the snap
If your Pi is running snapd, it’s dead easy (e.g. Ubuntu MATE or Ubuntu Core):
sudo snap install cloudflaredoh --edge
The snap is currently in the edge channel, meaning it’s not ready for the main stage just yet. Once I’ve spent a bit more time on it, I will move it to stable.
sudo snap set cloudflaredoh address=127.0.0.1<br></br>sudo snap set cloudflaredoh port=5053
Configure proxy-dns to listen on 127.0.0.1. If you want it to answer DNS queries from other computers on your network try either the IP address of the box, or just 0.0.0.0 to listen on all interfaces. It will also configure proxy-dns to listen on port 5053. If you want it to answer DNS queries from other computers on your network, use the default DNS port of 53.
sudo snap get cloudflaredoh
This will show you the currently set config options.
<pre class="wp-block-preformatted">sudo snap restart cloudflaredoh
Restart proxy-dns and use the new config.
Now you can use something like nslookup to query the DNS server and make sure it’s doing what you expected.
10 Steps To DNS-over-HTTPS
- Get a Raspberry Pi
- Download Ubuntu Core and write it to an SD card
- Put the SD card in your Pi and boot it
- Set up the network on Ubuntu Core (tip: register for an Ubuntu One account first)
- sudo snap install cloudflaredoh
- sudo snap set cloudflaredoh address=0.0.0.0
- sudo snap set cloudflaredoh port=53
- sudo snap restart cloudflaredoh
- Configure your client’s DNS server as the IP address of your Pi
- Have a cup of tea
Update 2019-08-01
I’ve got a new Github repo set up with an improved snapcraft.yaml which pulls directly from the upstream project. I’m aiming to get this hooked up to the Snapcraft build service so that we can package the latest version automatically. More on this later. In the meantime, you can clone this and build the latest version yourself: