Edit: I heard that Cisco have now removed the SIP firmware from their site. Someone seems to have hosted the files here: http://s000.tinyupload.com/index.php?file_id=44134296078826321023
Edit 2: Looks like the tinyupload file has gone missing too. Try this one:
https://drive.google.com/file/d/1EBJ-s9TIMKM0JVmZFWRk2bKeGxR9srFv
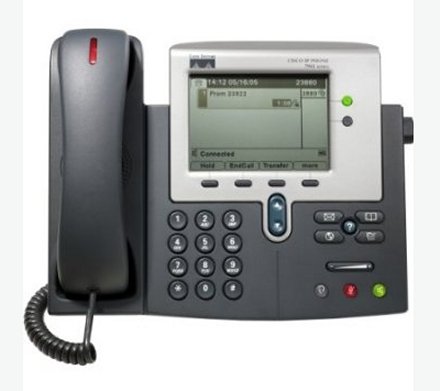
I got a Cisco 7941 off eBay. This is a phone which was £400 when new (some time around 2004) but can now be picked up for about £10. These phones went End Of Sale in January 2010, so even if mine was one of the last phones to roll off the production line it’s still about 7 years old but it’s still working perfectly. A testament to the good build quality of these phones, and perhaps the previous owner’s careful handling.
Since these devices are no longer supported many companies will be getting rid of them (or probably already have) so there should be some bargains to be had for phone geeks.
Q: Does the Cisco 7941 work with Asterisk?
A: Yes. You need to load the SIP firmware (the focus of this post) or chan-sccp (out of scope for this post but I’ll check it out at some point).
Q: Does the Cisco 7941 work with SIP?
A: Yes. You need to flash the correct firmware though.
Q: Is it really hard to get working?
A: No. If you’re comfortable with Linux and a few command line tools. And assuming you already have Asterisk set up.
Q: Is a lot of the information on the web about how to set up the 7941 wrong?
A: Yes. There is a lot of confusion about config files (the 7940 and 7941 use different ones).
Q: Will you tell us how you got your phone to work?
A: Yes! However – this is what works for me. You will need to tweak the config in places.
The steps to getting this phone working as a SIP extension on Asterisk on Ubuntu / Raspberry Pi:
- Set up a TFTP server
- Download the SIP firmware from Cisco
- Flash the phone with the firmware via the TFTP server
- Configure the SIP extension in Asterisk
- Write the config files for the phone and upload them via the TFTP server
- Make a call!
- Optional Extras
- Final Tip
Set up a TFTP Server
The phone will download it’s firmware and config via TFTP. It needs to download it’s config on every boot, so you will always need a TFTP server running. I think that if the TFTP server is unavailable it will just use the previous config, so it’s possible that you can get away without it, but I haven’t tried. My recommendation is that you install dnsmasq. It’s a small and full featured DNS server which also includes a DHCP & TFTP server which are easy to configure and it’s almost certainly packaged for your distro. You should also (temporarily) disable any other DHCP servers on your local network so that dnsmasq is the only thing offering DHCP addresses. This will simplify the process of getting the phone to find the TFTP server, since with dnsmasq it will all be automatic. If you later re-enable your original DHCP server, say on your router, then you will need to configure it to give out the address of the dnsmasq TFTP server and disable DHCP on dnsmasq. In my opinion, if you’re going to be running a Cisco IP phone on your network you’d be better off moving all DHCP to dnsmasq.
The full configuration of dnsmasq it’s out of scope for this doc, but in a nutshell you need these in your dnsmasq config:
- Set up a DHCP range
dhcp-range=192.168.1.1,192.168.1.100,24h
- Enable the TFTP server
enable-tftp
- Set the TFTP path
tftp-root=/home/<your user>/tftp (or whatever works for you)
Download the SIP Firmware from Cisco
Usually Cisco require a valid support contract before you can download anything useful from their website, but it seems that since these phones are now out of support they have offered up the firmware free of charge. You do still need to register an account to download the files. At the time of writing the latest version is 9.4.2 SR 3 dated 14th February 2017 – so bang up to date, even though these phones are end-of-life. Bizarre, but good for us. Thanks Cisco!
Go here: https://software.cisco.com/download/type.html?mdfid=280083379&catid=280789323
Follow the link to the SIP software.
You want to download the “SIP firmware files only”
Unzip that file into the root of your TFTP server (the location you set in the previous step). You should have 8 files in there:
apps41.9-4-2ES26.sbn
dsp41.9-4-2ES26.sbn
term41.default.loads
cnu41.9-4-2ES26.sbn
jar41sip.9-4-2ES26.sbn
term61.default.loads
cvm41sip.9-4-2ES26.sbn
SIP41.9-4-2SR3-1S.loads
This is everything you need to reflash your phone to the latest SIP firmware. Now you need to get the phone to reboot in to firmware download mode.
Flash the phone with the firmware via the TFTP server
- Unplug the phone from the power. Make sure that the network cable is still connected (unless you’re using using PoE).
- Plug the power back in and hold down the # key
- Eventually you will see the “line” lights start to flash orange. It might take a couple of minutes to get to this stage, don’t give up, just keep holding down #
- When the line lights are flashing type 123456789*0# This will start firmware download mode.
- The screen will go black for a moment and then go through the process of getting an IP address and connecting to the TFTP server
- Once connected to the TFTP server the software download will start
- The phone will reboot once download is complete and present you with an “Unprovisioned” message on the screen. This is good news! The phone firmware has now been updated.
I put together a video showing this process. It’s not very interesting but it will give you an idea of what to expect. The actual downloading of the firmware section has been sped up 3X.
Configure the SIP extension in Asterisk
Now you need to configure the SIP extension in Asterisk. Do this as per any other SIP extension, but bear this important piece of information in mind: The Cisco 7941 can only deal with 8 character passwords, so keep your SIP authentication secret to 8 characters.
While you’re in Asterisk configuration mode, take a moment to note down these bits of information as well (in Advanced SIP settings in FreePBX):
- RTP Port range, start and end.
- Bind Port (probably 5060)
Write the config files for the phone and upload them via the TFTP server
Please take the time to read this section fully, this is the part that is most troublesome. The Cisco 7941 is very picky about it’s config file and even a small mistake will stop the phone from working. These settings are specific to the 79×1 series of phones running at least version 8.x of the firmware. If your phone is not a 79×1 and/or is not running v9.x.x of the firmware then these settings are not for you.
Once the phone has loaded it’s firmware and booted, it will go looking for a file called SEP<PHONE MAC ADDRESS>.cnf.xml. So if the MAC address of your phone is 11:22:33:44:55:66 then the config file needs to be named SEP112233445566.cnf.xml. This file needs to be in the root of your TFTP server.
You will see mention of a file called XMLDefault.cnf.xml. If you’ve only got a few phones, don’t worry about this, you don’t need it.
So here is a config file which is about as minimal as I can make it:
<device>
    <deviceProtocol>SIP</deviceProtocol>
    <sshUserId>cisco</sshUserId>
    <sshPassword>cisco</sshPassword>
    <ipAddressMode>0</ipAddressMode>

    <devicePool>
        <dateTimeSetting>
            <dateTemplate>D/M/Ya</dateTemplate>
            <timeZone>GMT Standard/Daylight Time</timeZone>
            <ntps>
                <ntp>
                    <name><strong>#IP ADDRESS OF AN NTP SERVER#</strong></name>
                    <ntpMode>Unicast</ntpMode>
                </ntp>
            </ntps>
        </dateTimeSetting>

        <callManagerGroup>
            <members>
                <member priority="0">
                    <callManager>
                        <ports>
                            <ethernetPhonePort>2000</ethernetPhonePort>
                            <sipPort><strong>#SIP PORT NUMBER FROM YOUR ASTERISK SERVER#</strong></sipPort>
                        </ports>
                        <processNodeName><strong>#IP ADDRESS OF YOUR ASTERISK SERVER#</strong></processNodeName>
                    </callManager>
                </member>
            </members>
        </callManagerGroup>
    </devicePool>

    <sipProfile>
        <sipProxies>
            <registerWithProxy>true</registerWithProxy>
        </sipProxies>
        <sipCallFeatures>
            <cnfJoinEnabled>true</cnfJoinEnabled>
            <rfc2543Hold>false</rfc2543Hold>
            <callHoldRingback>2</callHoldRingback>
            <localCfwdEnable>true</localCfwdEnable>
            <semiAttendedTransfer>true</semiAttendedTransfer>
            <anonymousCallBlock>2</anonymousCallBlock>
            <callerIdBlocking>2</callerIdBlocking>
            <dndControl>0</dndControl>
            <remoteCcEnable>true</remoteCcEnable>
        </sipCallFeatures>

        <sipStack>
            <sipInviteRetx>6</sipInviteRetx>
            <sipRetx>10</sipRetx>
            <timerInviteExpires>180</timerInviteExpires>
            <timerRegisterExpires>3600</timerRegisterExpires>
            <timerRegisterDelta>5</timerRegisterDelta>
            <timerKeepAliveExpires>120</timerKeepAliveExpires>
            <timerSubscribeExpires>120</timerSubscribeExpires>
            <timerSubscribeDelta>5</timerSubscribeDelta>
            <timerT1>500</timerT1>
            <timerT2>4000</timerT2>
            <maxRedirects>70</maxRedirects>
            <remotePartyID>true</remotePartyID>
            <userInfo>None</userInfo>
        </sipStack>

        <autoAnswerTimer>1</autoAnswerTimer>
        <autoAnswerAltBehavior>false</autoAnswerAltBehavior>
        <autoAnswerOverride>true</autoAnswerOverride>
        <transferOnhookEnabled>false</transferOnhookEnabled>
        <enableVad>false</enableVad>
        <preferredCodec>g711ulaw</preferredCodec>
        <dtmfAvtPayload>101</dtmfAvtPayload>
        <dtmfDbLevel>3</dtmfDbLevel>
        <dtmfOutofBand>avt</dtmfOutofBand>
        <alwaysUsePrimeLine>false</alwaysUsePrimeLine>
        <alwaysUsePrimeLineVoiceMail>false</alwaysUsePrimeLineVoiceMail>
        <kpml>3</kpml>
        <natEnabled>false</natEnabled>
        <phoneLabel><strong>#PHONE NAME#</strong></phoneLabel>
        <stutterMsgWaiting>0</stutterMsgWaiting>
        <callStats>false</callStats>
        <silentPeriodBetweenCallWaitingBursts>10</silentPeriodBetweenCallWaitingBursts>
        <disableLocalSpeedDialConfig>false</disableLocalSpeedDialConfig>
        <startMediaPort><strong>#RTP START PORT#</strong></startMediaPort>
        <stopMediaPort><strong>#RTP END PORT#</strong></stopMediaPort>

        <sipLines>
            <line button="1">
                <featureID>9</featureID>
                <featureLabel><strong>#EXT NUM#</strong></featureLabel>
                <proxy>USECALLMANAGER</proxy>
                <port><strong>#SIP PORT#</strong></port>
                <name><strong>#EXT NUM#</strong></name>
                <displayName><strong>#EXT NAME#</strong></displayName>
                <autoAnswer>
                    <autoAnswerEnabled>2</autoAnswerEnabled>
                </autoAnswer>
                <callWaiting>3</callWaiting>
                <authName><strong>#SIP AUTH NAME#</strong></authName>
                <authPassword><strong>#8 CHAR PASSWORD#</strong></authPassword>
                <sharedLine>false</sharedLine>
                <messageWaitingLampPolicy>1</messageWaitingLampPolicy>
                <messagesNumber><strong>#VM NUM#</strong></messagesNumber>
                <ringSettingIdle>4</ringSettingIdle>
                <ringSettingActive>5</ringSettingActive>
                <contact><strong>#EXT NUM#</strong></contact>
                <forwardCallInfoDisplay>
                    <callerName>true</callerName>
                    <callerNumber>true</callerNumber>
                    <redirectedNumber>false</redirectedNumber>
                    <dialedNumber>true</dialedNumber>
                </forwardCallInfoDisplay>
            </line>

            <line button="2">
                <featureID>9</featureID>
                <featureLabel><strong>#EXT NUM#</strong></featureLabel>
                <proxy>USECALLMANAGER</proxy>
                <port><strong>#SIP PORT#</strong></port>
                <name><strong>#EXT NUM#</strong></name>
                <displayName><strong>#EXT NUM#</strong></displayName>
                <autoAnswer>
                    <autoAnswerEnabled>2</autoAnswerEnabled>
                </autoAnswer>
                <callWaiting>3</callWaiting>
                <authName><strong>#SIP AUTH NAME#</strong></authName>
                <authPassword><strong>#8 CHAR PASSWORD#</strong></authPassword>
                <sharedLine>false</sharedLine>
                <messageWaitingLampPolicy>1</messageWaitingLampPolicy>
                <messagesNumber><strong>#VM NUM#</strong></messagesNumber>
                <ringSettingIdle>4</ringSettingIdle>
                <ringSettingActive>5</ringSettingActive>
                <contact><strong>#EXT NUM#</strong></contact>
                <forwardCallInfoDisplay>
                    <callerName>true</callerName>
                    <callerNumber>true</callerNumber>
                    <redirectedNumber>false</redirectedNumber>
                    <dialedNumber>true</dialedNumber>
                </forwardCallInfoDisplay>
            </line>
        </sipLines>

        <voipControlPort><strong>#SIP PORT#</strong></voipControlPort>
        <dscpForAudio>184</dscpForAudio>
        <ringSettingBusyStationPolicy>0</ringSettingBusyStationPolicy>
        <dialTemplate>dialplan.xml</dialTemplate>
    </sipProfile>

    <commonProfile>
        <phonePassword></phonePassword>
        <backgroundImageAccess>true</backgroundImageAccess>
        <callLogBlfEnabled>1</callLogBlfEnabled>
    </commonProfile>

    <loadInformation>SIP41.9-4-2SR3-1S</loadInformation>
    <vendorConfig>
        <disableSpeaker>false</disableSpeaker>
        <disableSpeakerAndHeadset>false</disableSpeakerAndHeadset>
        <pcPort>0</pcPort>
        <settingsAccess>1</settingsAccess>
        <garp>0</garp>
        <voiceVlanAccess>0</voiceVlanAccess>
        <videoCapability>0</videoCapability>
        <autoSelectLineEnable>0</autoSelectLineEnable>
        <webAccess>0</webAccess>
        <spanToPCPort>1</spanToPCPort>
        <loggingDisplay>1</loggingDisplay>
        <loadServer></loadServer>
        <sshAccess>0</sshAccess>
    </vendorConfig>

    <versionStamp>001</versionStamp>
    <networkLocale>United_Kingdom</networkLocale>
    <networkLocaleInfo>
        <name>United_Kingdom</name>
        <uid>64</uid>
        <version>1.0.0.0-4</version>
    </networkLocaleInfo>

    <deviceSecurityMode>1</deviceSecurityMode>
    <authenticationURL></authenticationURL>
    <servicesURL></servicesURL>
    <transportLayerProtocol>2</transportLayerProtocol>
    <certHash></certHash>
    <encrConfig>false</encrConfig>
    <dialToneSetting>2</dialToneSetting>
</device>
Copy and paste this into a text editor and search and replace the following:
#IP ADDRESS OF AN NTP SERVER#– with – the IP address of an NTP server#SIP PORT FROM YOUR ASTERISK SERVER#– with – the SIP port of your asterisk server is listening on. Probably 5060#IP ADDRESS OF YOUR ASTERISK SERVER#– with – the IP address of your Asterisk server#PHONE NAME#– with – the text you want to appear at the top right of the phone screen#RTP START PORT#– with – the RTP port range start from the previous stage#RTP END PORT#– with – the RTP port range end from the the previous stage#EXT NUM#– with – the Asterisk extension number as configured in the previous stage#SIP PORT#– with – the SIP port of your Asterisk server. Probably 5060#EXT NAME#– with – the name you want to give this extension#SIP AUTH NAME#– with – the username for the SIP extension as configured in Asterisk#8 CHAR PASSWORD#– with – the password for the SIP extension as configured in Asterisk#VM NUM#– with – the number you dial for Voicemail. Probably *98
Note that this config file has two lines configured. If you just blindly search and replace you’ll end up with two extensions configured the same.
Some comments on what some of the XML tags do:
- ipAddressMode – 0 is IP v4 only. But this seems to have little effect.
- registerWithProxy – true – Registers the device with Asterisk, this allows incoming calls to be sent to the phone. If you’re getting “Unregistered” message on the screen, check you have this set.
- featureId – 9 is SIP
- autoAnswerEnabled – 2 – 2 seems to be “off”
- webAccess – 0 – 0 is on (?!)
- sshAccess -0 – ditto
- versionStamp – bump this up every time you make a change. Something like YYYMMDD001..2..3 etc
- networkLocale – United_Kingdom – sets the tones to UK, see the optional extras section for more info.
- transportLayerProtocol – 2 is UDP, 1 is TCP
- dialToneSettings – 2 is “always use internal dialtone”. See option extras for more info.
Edit this file as necessary and then save it to the root of your TFTP server with the filename: SEP<MAC>.cnf.xml. If your phone MAC address was aa:bb:33:44:55:66 then the filename would be: SEPAABB33445566.cnf.xml Note that it’s case sensitive, letters in the MAC address should be in upper case the extensions should be in lowercase. You can get the MAC address for the phone from the syslog on your dnsmasq server.
If your phone is still in “Unprovisioned” mode it will have been asking for this config file repeatedly. Once you save the file you should see the phone reboot shortly afterwards. It may download the firmware again for some reason, just leave it to get on with it.
Make a call!
If everything has worked you should see your extension listed on the right hand side of the screen near the buttons, and the name of the phone should appear at the top of the screen. If the icon next to the line buttons is that of a phone without an x through it, then you’re probably good to go! Press the line button and see if you get a dial tone. If not, then check the phone logs:
- Press Settings
- Press 6
- Press 1
From these logs you should be able to tell if the phone has loaded your config correctly. Errors about “updating locale” or “no trust list installed” can be ignored. If there is a problem with the config file itself a generic error will be listed here. If the phone won’t load the config file the most likely reason is that there is a typo in your XML file. Good luck finding it. You can SSH in to the phone to get more detailed logs and debugging information, but I haven’t tried this yet. Google is your friend.
Optional Extras
Dial plan
The dial plan tells the phone how to process the digits you type and when to start sending the call. Without a dial plan the phone simply waits a period of time for you to stop typing numbers before it decides you’re done and starts the call. By using a dial plan you can reduce the amount of time spent waiting after you’ve finished keying in the number. Here’s an example plan I’ve edited based on this post on Phil Lavin’s blog (Thanks Phil!) http://phil.lavin.me.uk/2012/11/united-kingdom-dial-plan-xml-for-cisco-phones/
<DIALTEMPLATE>
    <TEMPLATE MATCH="999" Timeout="0"/> <!-- Emergency -->
    <TEMPLATE MATCH="112" Timeout="0"/> <!-- Emergency -->
    <TEMPLATE MATCH="0500......" Timeout="0"/> <!-- Apparently 0500 is always 10 digits -->
    <TEMPLATE MATCH="0800......" Timeout="0"/> <!-- Apparently 0800 is always 10 digits -->
    <TEMPLATE MATCH="00*" Timeout="5"/> <!-- International, 00 prefixed. No fixed length -->
    <TEMPLATE MATCH="0.........." Timeout="0"/> <!-- UK 11 digit, 0 prefixed -->
    <TEMPLATE MATCH="26...." Timeout="0"/> <!-- My local STD numbers start 26 -->
    <TEMPLATE MATCH="\*.." Timeout="0"/> <!-- Asterisk *.. codes -->
    <TEMPLATE MATCH="\*98...." Timeout="0"/> <!-- Asterisk direct VM access *981234-->
    <TEMPLATE MATCH="1..." Timeout="0"/> <!-- Internal numbers -->
    <TEMPLATE MATCH="2..." Timeout="0"/>  <!-- Internal numbers -->
    <TEMPLATE MATCH="*" Timeout="5"/> <!-- Anything else -->
</DIALTEMPLATE>
Save this to the root of your TFTP server, named “dialplan.xml” (lowercase).
Ring tones
Everyone likes novelty ringtones. You can find plenty of ringtones in a format which is compatible with your phone (raw format, 8000 Hz sample rate, 8 bit, ulaw, max 2 seconds). These files need to be placed in to the root of your TFTP server. I tried putting them in a sub-directory but it didn’t work. Then you need to create a file called “ringlist.xml” also in the root of the server. The format of this file is:
<CiscoIPPhoneRingList>
    <Ring>
        <DisplayName>#<strong>DISPLAY TEXT</strong>#</DisplayName>
        <FileName>#<strong>FILENAME</strong>#</FileName>
    </Ring>
    <Ring>
        <DisplayName>#<strong>DISPLAY TEXT</strong>#</DisplayName>
        <FileName>#<strong>FILENAME</strong>#</FileName>
    </Ring>
</CiscoIPPhoneRingList>
Filenames are case sensitive. Once you’ve save this file, copy it to “distinctiveringlist.xml” as well. This will allow you to set ring tones for the default ringer and different rings for each line.
Dial tones
By default the 7941 will have a psuedo North American dial tone. This is annoyingly shrill (yes, it is). By specifying a NetworkLocale in the phone config we can get it to load a different set of informational tones from a file stored in (per the example XML above) United_Kingdom. In the root of the TFTP server create a directory called United_Kingdom. In this directory you need to create a file called g3-tones.xml. Bizarrely Cisco require you to have a support contract in order to download the correct tones settings for your country, despite giving the phone firmware away for free. Go figure. So this means I’m not going to paste the XML here. If you search hard enough you’ll find an example g3-tones.xml file you can use as a base. In our phone configuration above we told the phone to always use the internal dialing tone, so this means we only need to change the idial section of the tones file. The magic numbers are:
- 31538
- -780
- 30831
- -973
Wallpaper
The phone comes with a single default wallpaper with horizontal lines on it. This is easily replaced by your own designs with a simple PNG. Create a directory in the root of the TFTP server called Desktops. In here create another directory called 320x196x4.
In to this directory you need to place a “List.xml” file:
<CiscoIPPhoneImageList>
    <ImageItem Image="TFTP:Desktops/320x196x4/ubuntu-tn.png"
       URL="TFTP:Desktops/320x196x4/ubuntu.png"/>
</CiscoIPPhoneImageList>
The “-tn” in the file is a smaller thumbnail version of the larger image. The PNGs need to be sized exactly 320×196 for the large and 80×49 for the thumbnail. Here’s something to get you started:
![]()
![]()
Telephone Directory
You will have noticed that the phone has a “Directories” button and a “Services” button. I haven’t managed to add an extra phone book to the Directories button yet although I think it’s certainly possible, just that the XML file refuses to do anything. However, I have got a phone directory working on the Services button.
In the main phone config file there is a tag for “servicesURL”. Point this to a web server on your local network which will serve up an XML file. For example:
<servicesURL>http://192.168.1.1/phone/directory.xml</servicesURL>
Assuming you are using Apache 2 to serve that XML file (or it could equally be a CGI script which generates the XML dynamically from a database such as the FreePBX phone book) the format looks like this:
<CiscoIPPhoneDirectory>
   <Title>Whizzy Towers</Title>
   <DirectoryEntry>
       <Telephone>1500</Telephone>
       <Name>Lenny</Name>
   </DirectoryEntry>
   <DirectoryEntry>
       <Telephone>1234</Telephone>
       <Name>Speaking Clock</Name>
   </DirectoryEntry>
</CiscoIPPhoneDirectory>
Important note: You must tell Apache to serve those files as type “text/xml“. “application/xml” will not work.
You can do this via your CGI script, or if you want to serve a static file add something like this to your Apache config:
 <Location /phone/>
     ForceType text/xml
 </Location>
Inside your VirtualHost section.
Final Tip
Watch /var/log/syslog on the machine running the TFTP server. You’ll be able to see exactly what files the phone is asking for. Bear in mind that it does ask for files it doesn’t strictly need, so don’t worry too much about file not found errors unless it’s one of the above.
Here’s a final video showing the boot up for a fully configured phone