Working from home has many advantages. No commuting, relaxed approach to being dressed, loud music.
One of the drawbacks however, is that you are entirely reliant on your broadband connection. You could, as many do, have a 3G modem/phone as a backup. Fine for a few hours, but you’re soon going to run in to data caps, invisible proxies and traffic shapers (more so than a fixed line telco).
So what to do? My solution has been to get a second line installed. The big UK telcos are running a lot of offers at the moment to try and secure as many customers as they can in readiness for their Triple & Quadruple Play strategies. This means you can get a reasonable ADSL line and line rental for about 15 to 20 quid a month.
When you’re as reliant on a connection as I am, that’s money well spent. It also gives you a perfect opportunity to play with some new toys!
Now, you could simply plug in another wifi router to the new line, and when the primary connection fails move your connections over to the secondary one. But where’s the fun in that? What you really want to do is some load-balancing and multi-path routing over both the lines. You won’t see a sudden doubling in download speeds in normal browsing, but certain activities which open a lot of connections to different IP address should benefit, and you get to play with routing tables.
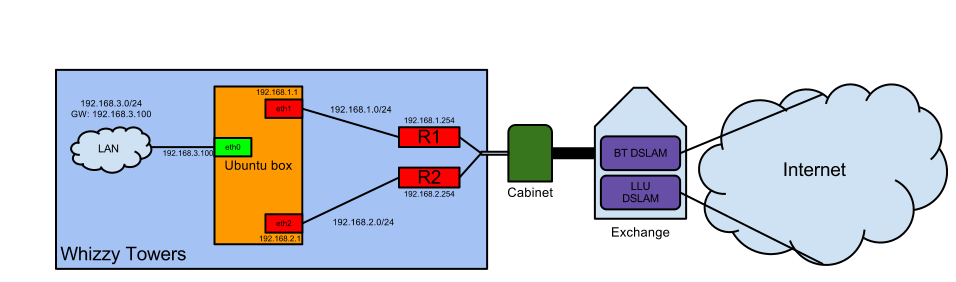
Here’s what it looks like:
We don’t really get much diversity until we get south of the exchange, and even then we’re probably going to live in the same fibre all the way to The Internet, but we do work round the much more common problem of ISP configuration errors.
Here’s how it works:
Router 1 (R1) and Router 2 (R2) are two independent ADSL modem/routers connected to a phone line each and the ethernet port connected to a NIC in a server. These modem/routers also take care of NAT, so that any traffic coming from inside your network will be translated to appear as if it had come from the appropriate router on it’s way to the rest of the internet. The server has three NICs in total, one each for the two routers and one back to the LAN for everyone else on the network to use as a gateway.
$IF0 = eth0
$IF1 = eth1
$IF2 = eth2
The IP addresses associated with those interfaces are:
$IP0 = 192.168.3.100
$IP1 = 192.168.1.1
$IP2 = 192.168.2.1
The routers are configured with these LAN IPs:
$P1 = 192.168.1.254
$P2 = 192.168.2.254
As you can see on the diagram, the networks are all /24 (255.255.255.0) which gives us network numbers of:
$P0_NET = 192.168.3.0
$P1_NET = 192.168.1.0
$P2_NET = 192.168.2.0
Then we configure the Ubuntu box as a router & NATing gateway:
1. Enable IP forwarding by editing /etc/sysctl.conf and uncommenting or adding a line like this:
net.ipv4.ip_forward=1
2. Create two new routing tables. Edit /etc/iproute2/rt_tables and add a line for each of your providers. For example:
1 my_isp_name
2 my_other_isp_name
3. Create some routes in each of the routing tables so the server knows where to send data. They take the general format of:
ip route add <em>$P1_NET</em> dev <em>$IF1</em> src <em>$IP1</em> table my_isp_name
ip route add default via <em>$P1</em> table my_isp_name
ip route add <em>$P2_NET</em> dev <em>$IF2</em> src <em>$IP2</em> table my_other_isp_name
ip route add default via <em>$P2</em> table my_other_isp_name
Using the real numbers and the template above gives us this actual set of commands:
ip route add 192.168.1.0 dev eth1 src 192.168.1.1 table my_isp_name
ip route add default via 192.168.1.254 via eth1 table my_isp_name
ip route add 192.168.2.0 dev eth2 src 192.168.2.1 table my_other_isp_name
ip route add default via 192.168.2.254 via eth1 table my_other_isp_name
In english, that means: In order to send traffic to the 192.168.1.0 network or the 192.168.2.0 network send it out of eth1 or eth2 from IP address 192.168.1.1 or 192.168.2.1. These routes are then stored in the relevent routing table; either one called my_isp_name or one called my_other_isp_name.
4. Create some additional routes for communicating between the routing tables and the local interfaces. This is as much of an efficiency saving as anything, telling each routing table the quickest way to the other interfaces.
ip route add <em>$P0_NET</em> dev $IF0 table my_isp_name
ip route add <em>$P2_NET</em> dev <em>$IF2</em> table my_isp_name
ip route add 127.0.0.0/8 dev lo table my_isp_name
ip route add <em>$P0_NET</em> dev <em>$IF0</em> table my_other_isp_name
ip route add <em>$P1_NET</em> dev <em>$IF1</em> table my_other_isp_name
ip route add 127.0.0.0/8 dev lo table my_other_isp_name
5. Add the routes to the main routing table, so that traffic knows how to find the networks which have the gateways to the internet on:
ip route add <em>$P1_NET</em> dev <em>$IF1</em> src <em>$IP1</em>
ip route add <em>$P2_NET</em> dev <em>$IF2</em> src <em>$IP2</em>
6. Apply the correct routing rules depending on where the traffic is coming from:
ip rule add from <em>$IP1</em> table my_isp_name
ip rule add from <em>$IP2</em> table my_other_isp_name
7. The science bit. Create a route which will send traffic down each of the internet connections in turn. This is a global default route, so any traffic which isn’t bound for the local $P0_NET network will use this rule to get to the internet.
ip route add default scope global nexthop via <em>$P1</em> dev <em>$IF1</em> weight 2 nexthop via <em>$P2</em> dev <em>$IF2</em> weight 1
As you can see, this isn’t a 50/50 split. We’ve applied some weighting, in this case because I get more GBs with my_isp_name. We’re actually going to send twice as much traffic down $IF1 as we are down $IF2.
8. By default, routes to other networks are cached for 10 mins. This means that once a route is decided on, traffic will always follow the same route for at least the next 10 minutes. The counter will be reset every time that particular route is used. This is great for large downloads because it means that your IP address isn’t suddenly going to change half way through getting the file. But, for something like IRC where it’s possible that no traffic will be sent for 10 minutes, then the IRC server could well see your IP address changing as traffic flips between the two routes. IRC servers don’t like that. So you need to fix some routes so that traffic will always follow the same path.
ip route add 174.143.119.91/32 via <em>$P2</em>
This sets the route to a specific Freenode IRC server to always go via my_other_isp_name.
9. Last of all, we need to add an extra layer of NAT so that traffic can find its way back to the host on the LAN side. This is necessary because our internet modem/routers are not really routers at all. They simply take traffic from one side, rewrite the headers and push it out the other side, while maintaining a look up table of what came from where and doing the reverse when a reply arrives. If you can configure the routes on to your modem, then you don’t need to be reading this in the first place, so let’s assume you can’t.
iptables --table nat --append POSTROUTING --out-interface $IF1 -j MASQUERADE
iptables --table nat --append POSTROUTING --out-interface $IF2 -j MASQUERADE
iptables --append FORWARD --in-interface $IF0 -j ACCEPT
For things like port forwarding you do now have to deal with a bit of an odd NAT situation. For example, let’s assume I want to run a web server on the same machine that runs the routing. I decide to only make the server available on the WAN IP address of $R1. I set up Router 1 to NAT port 80 on the WAN to port 80 on $IP1. Then I need to configure the web server on the routing server to listen on that interface. Not too bad really.
And there you have it. Two internet connections, both available to all the clients on your network. Make sure that your clients use the IP address of the server as their default gateway and everything should just work. The additional load on the server is negligible.
If you reboot the server you’ll need to add all the routing information again, so create yourself a Bash and have it run from /etc/rc.local or something.